
This was a week full of puff! Puff pastry has always been one of those things that sort of intimidated me for two reasons: one, because it always just felt so complicated, and two, with all of the pretty things that you can make with it, it just doesn't feel like it could be easy. However, after making puff pastry for a week, I can say that it intimidates me no more!
Throughout the unit, there are three different kinds of puff that we'd make: quick, classic, and inverse. On Monday night, the very first thing that we did was make our first type of puff pastry, which was quick puff. Of the three, it's the easiest to assemble initially, but I think it's the most annoying to roll out, at least for the first few turns of the dough. When you make quick puff, rather than making a butter block (which I'll get into in a minute), you just cube your butter and mix it all up with the flour, and sort of let it hang out. Then when you roll the dough out, the butter sort of just sheets itself and disperses throughout the dough.

Quick puff
Quick puff is also the only type of puff pastry dough that has a double turn, which is what that picture is showing. You roll our dough out into a long, skinny rectangle, then fold it toward the center on either end, then fold it in half, like a book. This is sometimes just referred to as a book turn, conveniently enough.
As soon as our quick puff was chilling in the fridge, we assembled our classic puff. Of the three, I think that this one tastes the best. This is really just a matter of personal preference, but for me, I love it. In classic puff, there are two separate pieces, the dough block and the butter block. Hard to believe that there's almost a pound of butter - yes, you read that right, a pound - of butter in each recipe. It does make a pretty decent amount of dough, but it's still a lot. Chef Jeanne was saying that some guy did math and worked it out that every croissant has about two tablespoons of butter in it, so it seems less bad when you're looking at that whole pound. Even though two tablespoons of butter is still a TON. But anywho, back to the puff.

Classic puff assembly
Once the butter is incorporated into the dough (you just wrap it up in there like a little present), it's pretty similar to the quick puff when it comes to assembly. The only major difference, assembly-wise, is that this dough gets single turns (or letter turns), rather than double turns. The classic dough ended up with 6 single turns, and the quick puff ended up with 4 double turns, I believe.
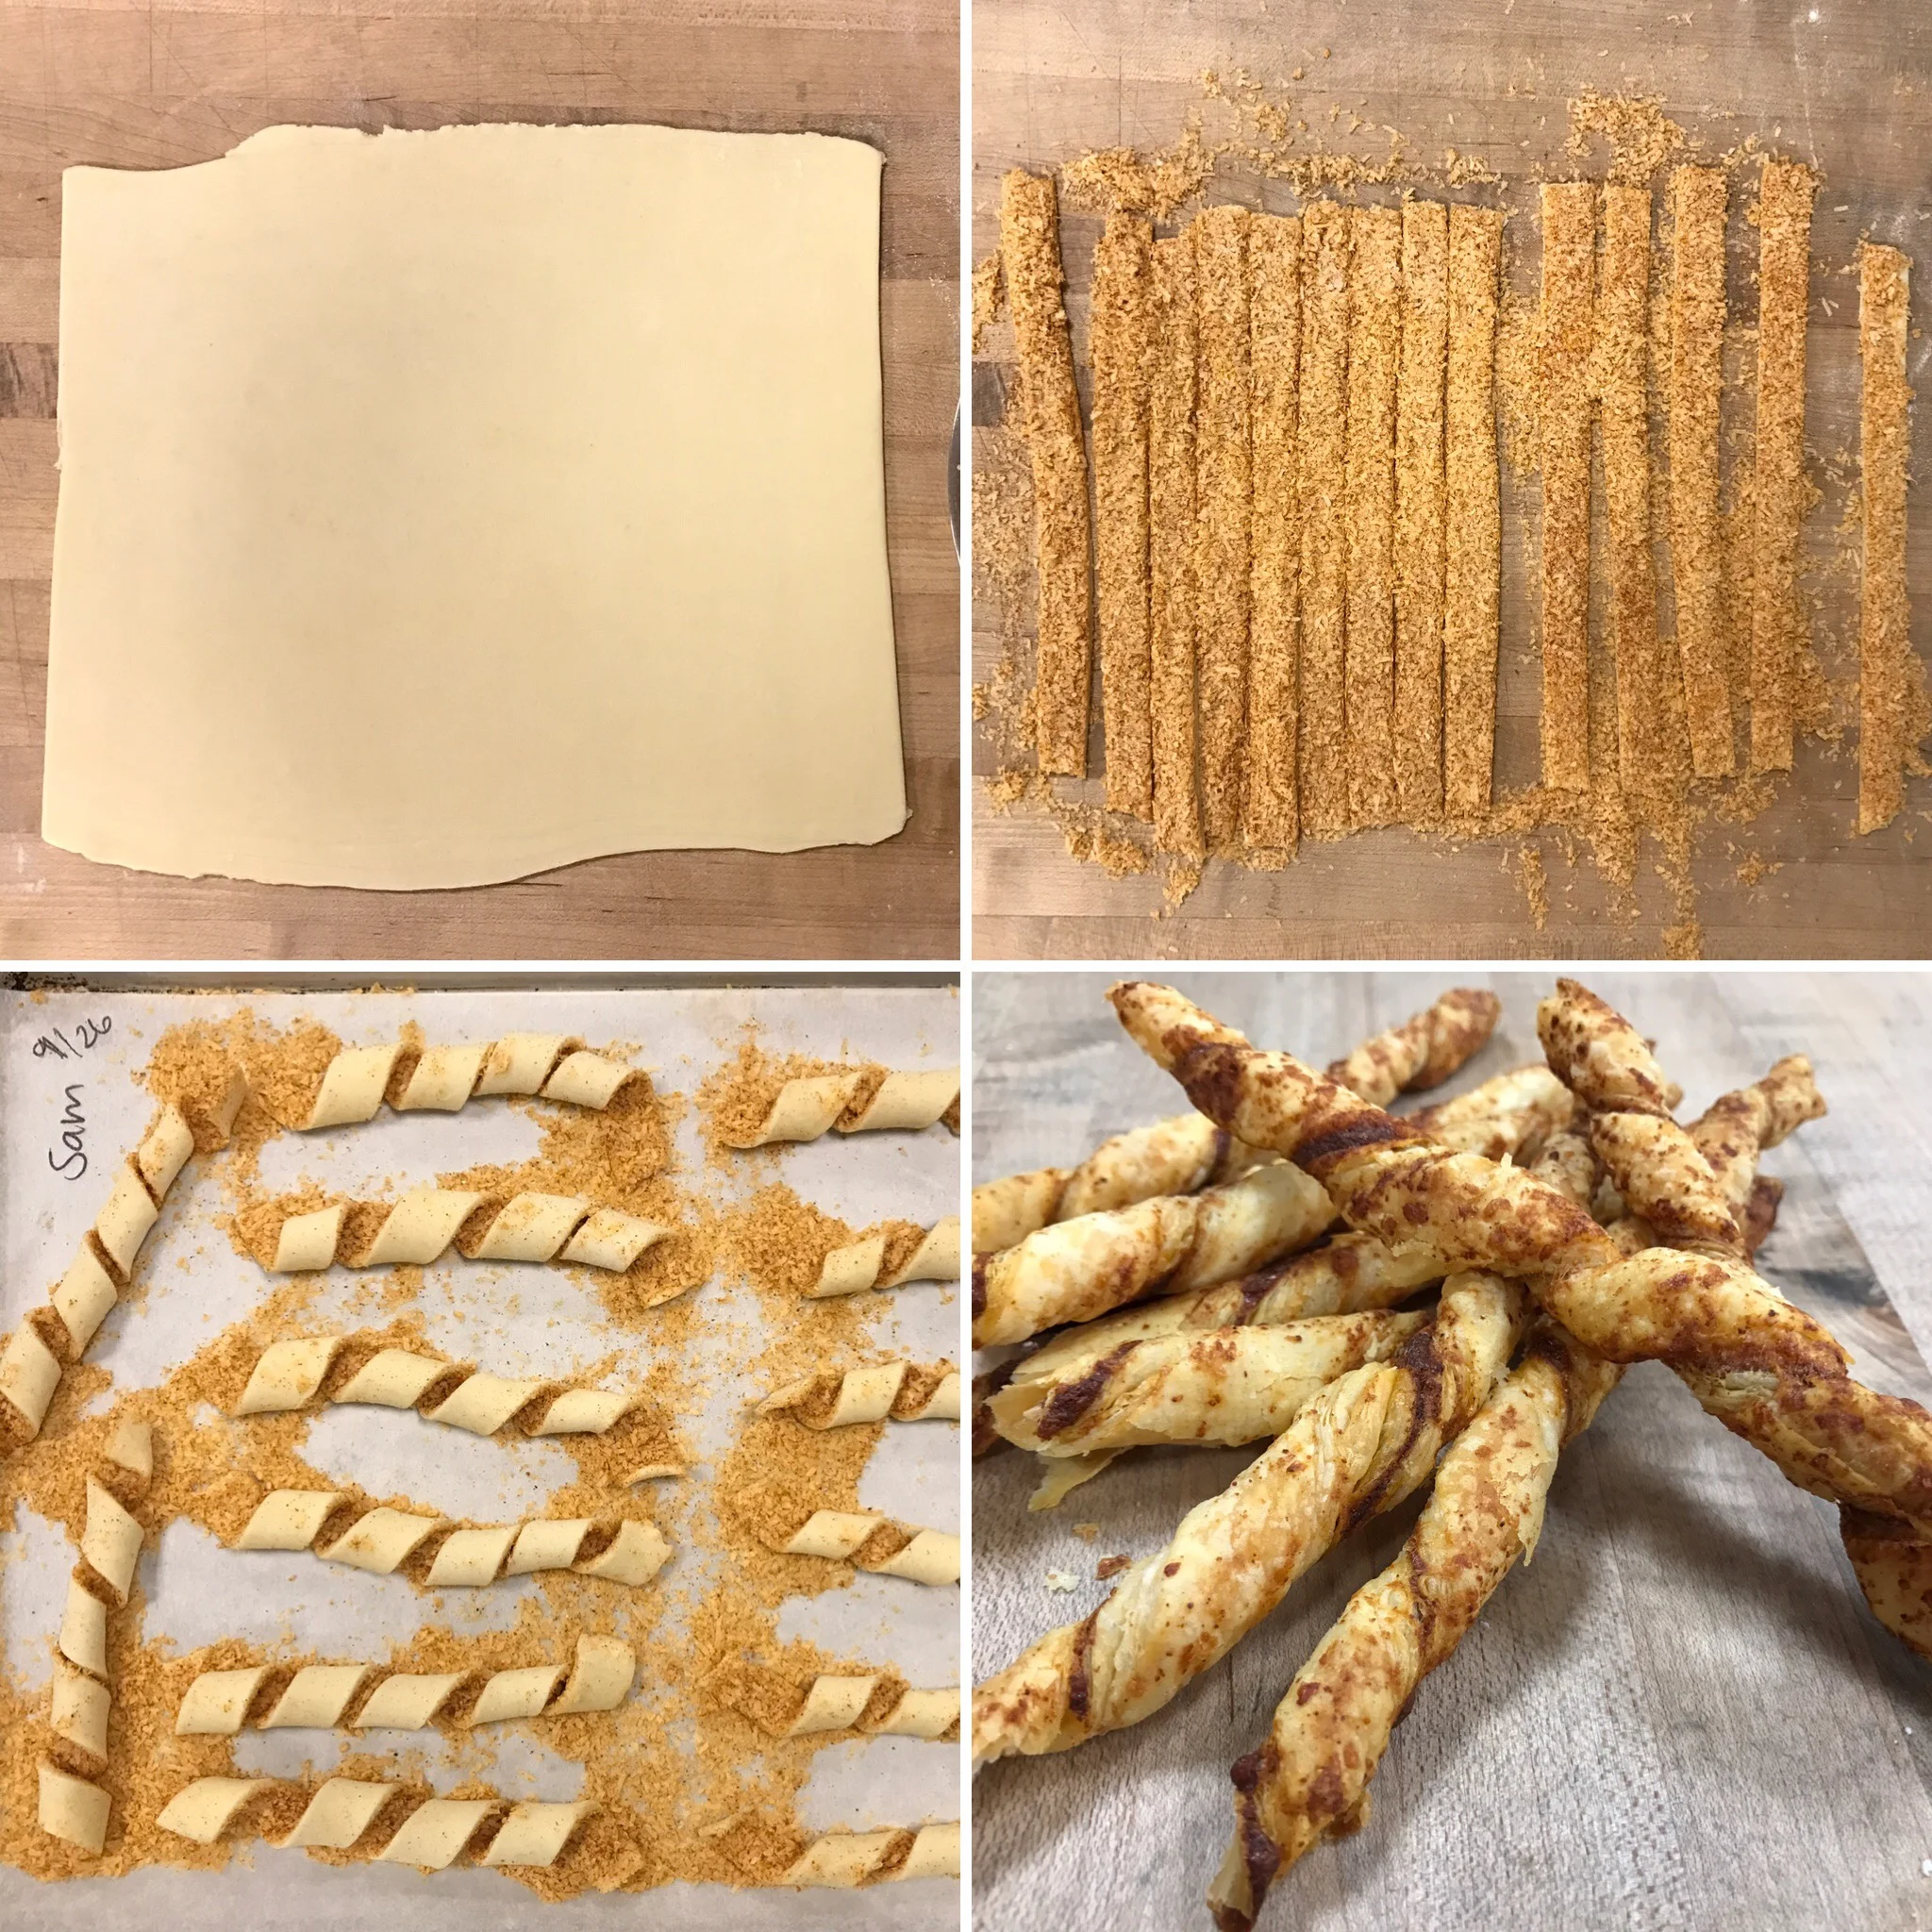
Cheesy straws!
Once all of our dough was ready, we started to bake! The first thing that we made on Monday night were cheese straws. Oh my goodness, so yummy! I mean, who doesn't love cheese? These were sort of similar to the cheese puffs, in that the cheese mixture was the same, but rather than the cheese being mixed into the dough, it was pressed on top. After that, we cut them into long, skinny strips, twisted them. Unfortunately, time got away from us on Monday night, so we had to wrap up our cheese sticks and finish them up on Wednesday.
On Wednesday, things got pretty complex pretty quickly. The first thing we did was finish off our cheesy straws, then we made almost the same thing, except we used sugar and chopped almonds. These ones were a lot sweeter than the cheese ones (obviously), but I think on the whole came out nicer once they were baked. I, of course, forgot to take a picture of them after they were baked, but for reference, they look a little something like this.
From there, we went on to make our Gateau Pithivier. This was a cake sort of thing that was filled with a mixture of almond cream and pastry cream. I thought that it sort of looked like a giant ravioli, but maybe that's just me. The first thing we did was roll out our dough, obviously, and then we cut out two giant circles. From there, we made a one inch border of egg wash to secure the edges once it was sandwiched together, then went ahead and filled and sealed it, then finally cut it out into one cohesive circle. To get the little scalloped edges, we used a big pastry tip tocut the scallops in, and we used the smallest pastry tip that we had to poke a little steam hole in the top. This was to prevent the puff from basically exploding. The last step was to egg wash and score it before finally putting it in the oven. I was really surprised by how much this thing puffed up from it's original size. I know that puff pastry indicates that it will indeed puff, but up until this point, the only thing that we're really made were the straws, which didn't puff up hardly at all. At least, not compared to this thing.

Gateau Pithivier
I think that Friday was the most stressful day this week, not because we had a lot to do, but because of one of the things we were making: tarte tatin. I'd never made tarte tatin before, and fortunately for me at work that morning, we made one in class, but I didn't get to see it through to the end, which involved flipping it upside down to remove it from the pan. That whole part was just a little bit intimidating, especially considering you had to flip it when it was hot, otherwise the caramel would get too sticky and your whole tart would stick to the bottom of the pan, which would be no bueno.
But, that was an entire night away, so I tucked that thought into the back of my mind and pushed forward. The first thing that we made was the mushroom jalousie. I always love when we get to bake savory things (not that I don't love desserts, I do!), but it's just a nice departure from the regular stuff. We used a combination of brown mushrooms and oyster mushrooms, chopped those up, and mixed them with garlic, chives, parsley, onion, and you guessed it, more cheese. We also added that whole mixture to some bechamel sauce, which is basically just a white sauce with some spices. Once our mushroom mixture was made, we set it aside to cool down, and we got to work on the tarte tatin.

Tarte tatin in the works!
The first thing that we had to do for that was cook our apples. Minor side note: when you get down to it, tarte tatin really isn't terribly complicated, other than the whole flipping-over-a-hot-pan-with-near-boiling-caramel thing. Really all it is is cooking apples, making caramel, and laying a circle of puff pastry over the top, and sticking it in the oven. The apples took a little bit longer to cook than originally anticipated. We had to make sure that they were cooked relatively evenly on both sides before adding in an absurd amount of sugar to caramelize. As soon as the apples were caramelized, we got to flambé them, which was super exciting. The last time that we flambéed something, I was a little bit afraid to do it, so my partner for that unit took the reigns. This time around, however, I decided that it couldn't be all that difficult so I just went for it. I can't confirm, it really isn't all that difficult. Pour alcohol, ignite with torch, flambé! From here, we just waited for the alcohol to cookoff, laid our circle of puff pastry on top of our fruit, and stuck it in the oven.

Mushroom Jalousie
After the tarte tatin was in the oven, the last thing we had left to do was assembled the mushroom jalousie and get that in the oven. Since we had already made our deliciously cheesy mushroom filling, all we had to do was cut our puff into the appropriate sizes, plop the filling in the middle, put the top on, egg wash and bake. On Friday night, we also assembled apple turnovers, but we ran out of time to bake them. So we wrapped them up and put them in the fridge for Monday. My partner and I were the first ones to pull our tarte tatin out of the oven. I took on the task of flipping it, and boy was it nerve-racking. I guess it really isn't that terrible to flip it over, it's just more cumbersome than anything. Reason being, we had a half sheet tray that we had to balance in the middle with one hand on top while on the underside we had the hot pan with boiling caramel which obviously gets held by the handle, and not the bottom of the pan. I have since made tarte tatin at work, and we flipped them out onto plates (rather than sheet trays), and I can confirm that is 1000% easier.

Tarte tatin, pre and post flip
I have one more week left in the puff pastry unit, then I'll be moving onto cakes! This program is just flying by, and I'm loving every minute of it!
Stay tuned for my blog next week (or in a few days, really), and if you want more frequent updates, you can check out my Instagram.
Thanks for reading!